Get more fruit bushes for free by taking cuttings!
- paddywakeham
- Jan 24, 2021
- 5 min read
Increase your fruit bush numbers and learn how to propagate other woody plants by taking hardwood cuttings...

Taking hardwood cuttings is a great way to increase your stock of fruit bushes, plus other woody plants such as Roses, Dogwoods, Willows and Viburnums - This blog will outline what you need to do to start getting your own plants for free, by taking cuttings!
Hardwood cuttings are taken during the dormant season - basically while the plant is not actively growing and in the UK this is generally between November and March - The best time is either just after leaves have dropped or just before buds break in spring. Luckily you don't need a lot of equipment or experience to take cuttings, just basic tools and some healthy "parent plants". In this blog I am using pruning material from my Whitecurrant, Redcurrant and Gooseberry plants, as I have an insatiable desire for more fruit bushes but an unwillingness to part with any cash for new plants!
I will list the equipment below, then explain the method and some background in more detail further on in this blog:
Materials & equipment
Secateurs
Labels
Compost
Pots or outdoor bed
Cutting material
Make sure you have a pair of good secateurs and that these are sharp and clean - Currant bushes (and indeed most plants) can suffer from a number of diseases and you don't want to transfer these to new plants by forgetting to clean your cutting equipment! (Diluted bleach, disinfectant or IMS can be used - but whatever you choose to sterilise your tools, be sure to follow the label’s safety precautions)
Whether you choose to grow in pots or in an outdoor bed, you need to make sure there is sufficient drainage, so use a gritty compost mix or add some sand or grit to the bed.
Choose healthy established plants to obtain your cutting material. You can either use your existing plants or ask a friend or neighbour if you can take some cuttings from theirs - Offer some sort of future incentive if taking the latter approach - A few plants or a jar or two of currant jelly is a good exchange!

This year I am using pruning material from fruit bushes which are a few years old now and needed some attention.
Method
Ok, now that you have all your equipment ready and a source of cutting material, it's time to get started! I'll list the steps to take with some more in depth discussion at the end, and probably chuck in some "educational terminology" to keep it "fun" (Hmmm)...
Select healthy one year old stems and cut from the base of the plant
Trim soft growth and cut stems to lengths around 15-25cm
Make a flat cut 5mm below a bud (Make sure stems are right way up)
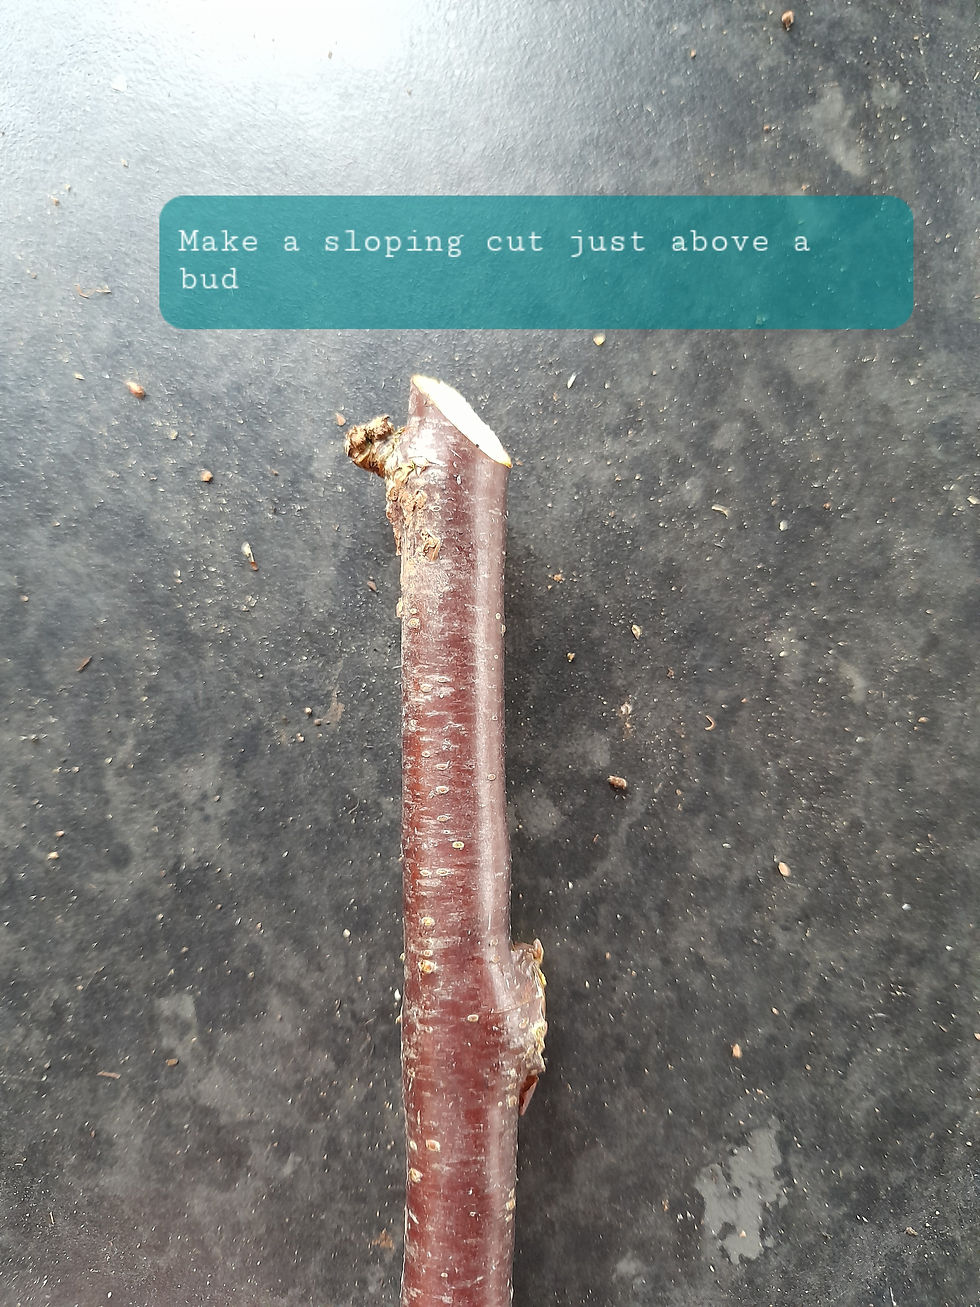
Make a sloping cut just above a bud
Prepare pots or outdoor bed using a free draining compost mix
Dip cuttings in fresh hormone rooting powder (if using)
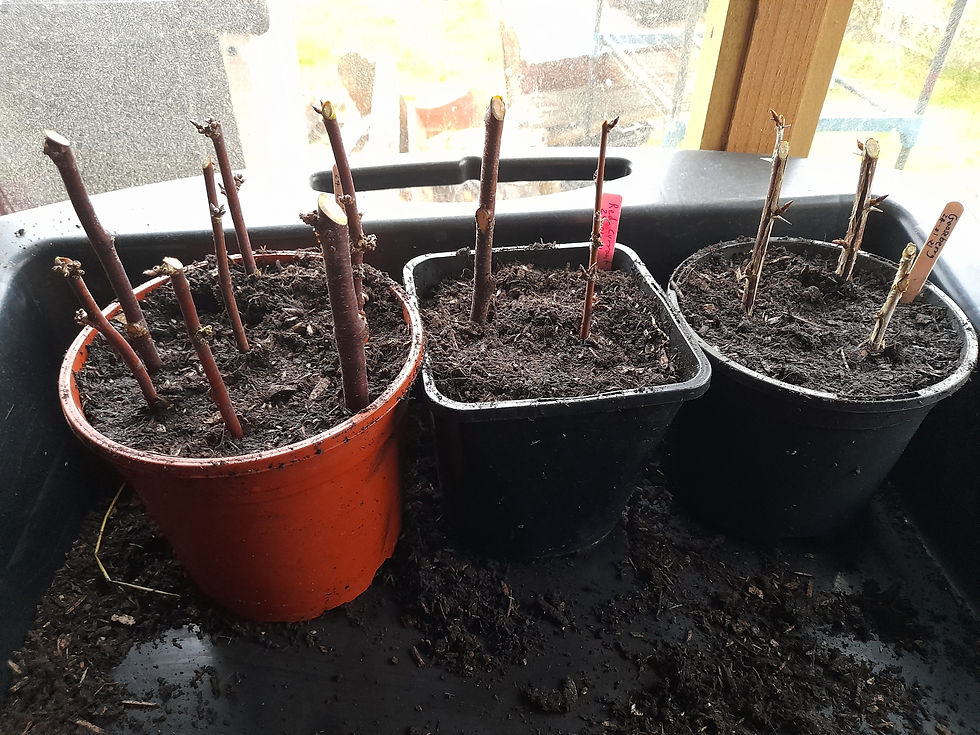
Bury cuttings about half way, leaving 3 to 4 buds above ground
Firm in and water
Label (very important)
Wait patiently for buds to break in spring and transplant once roots develop
Cutting material
This is the piece of parent plant that is used to make a whole new copy! In our case dormant woody stems from young growth. Taking cuttings is a technique known in the horticulture world as "vegetative propagation" which is basically a way to "clone" an original plant - Therefore it is important to select healthy, disease free growth, as any defects or illness will be present in the new plant - Not what we want when trying to satisfy our greed for free fruit, for which you will need healthy plants! You ideally want growth from one year old shoots (the current seasons growth) as it is easier to get these to produce roots - This year I am using some pruning material, so I am limited to what I have available and will therefore use some older growth as well, but it's not advisable if you want a good success rate!

I am having to use what I can get from pruning material this year, so I am going to experiment with using some older growth - around 2 years old.
Making the cuts
First of all make sure your stems are the right way up i.e. the buds are facing upwards, then make a flat cut 5mm below a bud. This is an area where there is a high concentration of plant hormones, which will tell the plant which type of cells to make - In our case, any buds underground will make root cells which is what we want! Once you have your flat cut and the cutting the right way up, you can count 4 to 6 buds and then make a sloping cut just above a bud - This serves two purposes: It helps any water run off but also tells you which way up to plant the cutting!

Use clean sharp secateurs to cut straight below a bud.

Then make a sloping cut just above a bud - This will help rain to run off.
Rooting powder - To use it or not, that is the question?
Hormone rooting powder is used to increase the chances of a cutting's ability to form new roots. They contain synthetic growth hormones known as "Auxins" - The plant makes these naturally, and they basically tell new plant cells what to "become". In the case of a cut end of stem that is below the ground, this is new root cells!
Seeing as plants contain these hormones naturally, they usually don't need adding - and I generally don't bother...Their application may be useful on a commercial set up, to increase success rates, or for plants which are particularly difficult to get cuttings to strike, but I have never bothered with it and generally have good success with my cuttings! A word of caution if you do choose to use it - rooting powder must be fresh and you cannot put used powder back into the container as you will render the whole lot useless!
Planting or "sticking" the cuttings
Once you have either dug a trench or got some pots ready, they can be filled with a gritty compost mix (1 part horticultural grit or sand, to 3 parts compost) and then you are ready to stick the cuttings. Push the cuttings, with the sloping cut to the top, about half to two thirds of the way into the compost, leaving around three buds above ground. Firm the compost around them and water in. Make sure you label to avoid "mystery plants".
Aftercare
Hardwood cuttings require little aftercare and can generally be left alone until the following year, before they are transplanted to their final growing position. Water during dry periods (or more regularly if in post) and keep an eye out for pests and diseases. Once a good root system has developed, they can be carefully dug up, or turned out from the pots and transplanted to your desired location - where they will establish and produce bountiful crops of fruit, and will go on doing this year after year, providing you show them some care and attention! We usually get half a dozen or so jars of jelly from four bushes on the allotment - Hopefully more in a few years time if my cuttings are successful!

I have chosen pots this year, but often with hardwood cuttings a simple outdoor trench works just fine. The advantage with pots is that they can be moved around, whereas cuttings rooted outside will need to stay in situ for up to a year.

Gooseberry stems are very spiky so be careful when pruning and taking cuttings! The buds are nicely visible in this picture, facing upwards so the right way up. Sloping top cut helps water run off and is useful so you know which is the top when sticking.
Final thoughts
Hopefully I have inspired you to have a go at taking your own hardwood cuttings and that your efforts will be rewarded with free fruit bushes and the subsequent harvest for years to come! Hardwood cuttings are an easy way to increase your stock and once you have mastered this skill, you can take them year after year, providing endless new plants!


Comments